Showing posts with label floor. Show all posts

Sunday, August 22, 2021

Chateau foyer

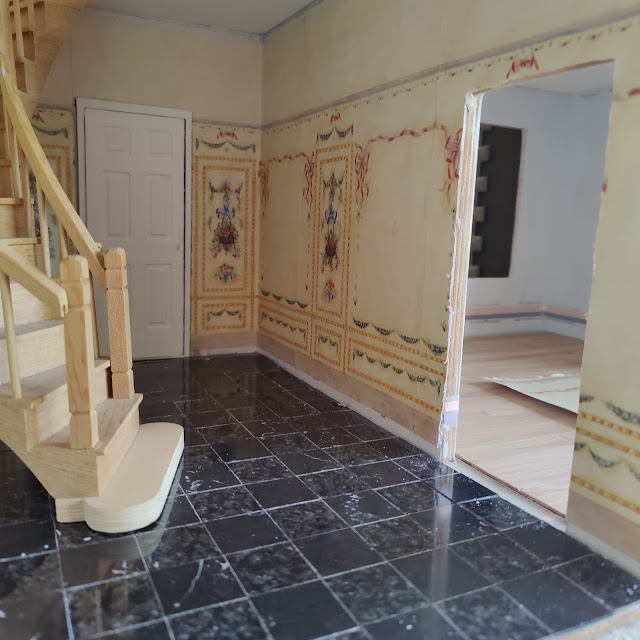
I was able to wallpaper the foyer this weekend, which entailed reordering more of the mural paper because 2 of 4 sheets were a darker run. The new stock was all lighter, and I then used the 2 darker as templates to plan the pattern placement. That actually worked well, and once I had the plan in place I just started cutting pieces. The challenge here was that the pattern between the panels was wider, and this is a small room. I decided to therefore force a narrower pattern, which meant the compromise was more piecing together. 

In the end I think it looks nice and I'm pleased with it. That's not to say I would do that again, I probably spent way too much time debating and cutting. Anyway, it's done, and I was able to move on to gluing the ceiling in place and wallpaper the 2nd floor hall as well. 

You can also see the marble floor that I finished earlier, very happy with that as well!


Saturday, August 14, 2021

Chateau progress

 The conservatory floor has evolved and for now it's done. I glued it and it was pretty busy, so much contrast in the marbling. My first mistake from there was applying Mod Podge, which left brush strokes. Rather than try to fix that, I began coloring it using a whitewash. That effect was much more pleasing to the eye. Then I made my second mistake - using old polyurethane that turned it yellowish. Sigh. 

Next was to sand the heck out of it to remove the poly and see how far I could get in removing the mod podge because that was really showing the brush strokes now. Using both my mouse detail sander and the my other square one, I finally got it down to under the Mod Podge, alternating with wet rags and acetone. 

Next was to apply white washes again and that ended up nicely. I sprayed it with a satin sealer and then I stopped futzing with it.


The foyer was next and my plan was to use the black marble Magic-Mini tiles I have had for years. My efforts of late seem to get tangled up in challenges causing rework of some kind....sigh. I didn't have quite enough tiles, I was shy by about a row, so 10 or so tiles. I was able to hunt down some that were similar and purchased them. Then I had to decide how to mix the two, in a checkerboard or use one as a border. Checkerboard won out and I'm very pleased with the results. I had to harken back to my days of cutting these formica tiles years ago with the French Country, so I pulled out my trusty Chopper II. It did the trick just fine. I used YES wallpaper paste to attach these and that ended up working well.


The wallpaper for the foyer came to me out of nowhere...I haven't ever used a mural and decided it was time to try my hand at this Of course I obsessed over just the right one for a long time, lots of hours on websites looking for finished visuals of some of the ones I had seen. There are very few examples of these and I found this frustrating. 

I bit the bullet and bought this Jackson Miniatures Fruit and Flowers and when it arrived I was very excited about it. Then I spent a bunch of time obsessing about how I would plan the patterning. So this is what you will see. I will be making cuts so that one panel is on either side of the front door, and then shorten the space between the panels on other areas. Quite a challenge for me. Sadly I found out that 2 of the 4 pieces are darker tone. Sigh. So I have just ordered more from the same person and requested that she send me all the same, either light or dark. There will be waste if I want the placement of the pattern a certain way. It all starts to gel when you put in the ceiling and the stairs and the door to really give it a true perspective.


I had one flickering fireplace embers insert from a few years ago, and of course I will need 2 so had to hunt down where I got it, and luckily I nabbed a second. This is pretty cool, I've never had a flickering one before. You will also notice the alligator clips are lighting it...yeah I broke down and bought one (well 5 came in the package!) that attaches to a 9V battery so I can test my lights easily.


I had to buy this beautiful set of Wilhelmena wicker while I was shopping for other things. 


Sunday, July 05, 2020

Bathroom

I finished the flooring in the bath, applying it to cardboard so that it would sit smooth. I also finished the chair rail and wainscoting.

You will notice I have lights here - these are battery powered lights. I still may try hardwiring some lights I have directly to the ceiling where there is tapewire. I think the wiring would be hidden. 


Monday, January 21, 2019

Bathroom plans

I've been thinking about how I'm going to finish and furnish the bathroom in the wing attic space. All the angles are a challenge.

I love Sally Wallace's version of it, so I'm using it as inspiration. I'm not enamored of the turquoise floor but I love the dark wallpaper. I chose a Brodnax wallpaper that has those dark colors. I also love how she has a sitting room space, I hadn't thought of that.

I began placing things I've purchased and looking at flooring options. I was hoping to use some of the flooring I have. I have some 1" tiles but not enough - its a big floor. So I pulled out some paper flooring I had stowed away. I may try the beige one here...though I did order a marble World Model floor yesterday.

I need to figure out how to do a round shower curtain. The stand I bought doesn't include the round shower ring. I may have to rig my own ring on it, one I make from strong wire.


This is the floor from World Model I ordered. 

Possible flooring


Wallpaper for bathroom


Sunday, March 19, 2017

Flooring and Wallpapers

The foyer wallpaper was put up, and I wasn't happy with that, there were wrinkles. So I stripped it and put up another, and I'm happy with it.


The kitchen tiling got laid and grouted. These tiles are from Romney in England. I did them on a template and had the tiles extend beyond the template, I wasn't entirely sure how well these would cut to size, and attempting to cut each individually along both long sides seemed daunting. I went with their advice, cutting with my miter saw after they were glued down. 


Here's a picture of the upside down floor as I sawed off the extra. 


Living room flooring is laid, awaiting stain. You can see my finished fireplace, chimney breast, and the chandelier I will put in here.


Dining room floor got laid on template, awaiting stain also. Temporarily hung the chandelier - love this one!


Wednesday, February 17, 2016

Thornhill Design Resources and Notes


Keeping track of colors, sources, how-to's is something I'm not very good at so rather than keep a paper notebook, I'm going to post here.

Wallpapers

  • 2nd floor guest bedroom - Itsy Bitsy Mini - Bird Toile 704A
  • Bath - Itsy Bitsy Mini - Rose Toile 656
  • Man's Study - Itsy Bitsy Mini - Wildlife Collage 302B
  • 2nd floor Hall - Itsy Bitsy Mini - French Kitchen 590A
  • 3rd Floor bedroom - Itsy Bitsy Mini - Curtain Toile 710A
  • Kitchen 'tile'  and overlay is World Model (2 1/8w x 2 5/8h)
Flooring
  • Wood - 3/8" Cherry strips from S.H. Goode & Sons 
  • Kitchen & Dining room tile - Le miniature di Eurosia terracotta
  • Foyer hall 1st and 2nd floor - Brodnax parquet
  • Sun room/Conservatory - Lawbre tile adobe
  • Bathroom - cut tile
Built-in items
  • Kitchen cabinets - M&R Miniatures
  • Fireplace Living Room
  • Fireplace Man's study - Braxton Payne
  • Fireplace back wall Man's Study - Lawbre AE925 - Wall Panel
Furniture

Bespaq
JBM
DeCava Interiors
BB Miniatures


Paint/Finishes
  • Living Room/Hall - color wash - Ceramacoat Antique White base, wash of McCloskey (Valspar) Raw Umber Glaze
  • Dining room
  • Kitchen
  • Master Bedroom
  • Exterior - spackle and color wash
  • Kitchen cabinets - Folkart Teddy Bear Tan 419, and a color wash or Burnt Umber color wash from 
  • Kitchen counter - Fleckstone
  • Chimney - DecoArt Sandstone Light Brown
  • Foundation  - Duncan Granite Stone - Sand

Wednesday, May 07, 2014

3rd Floor

I now have the center 3rd floor room and the one on its left plastered. And the first coat of base paint is on the center room. I think the color will be like the living room - very light yellow/antique white with a wash of a yellow and maybe coral.

My billiard/pool table arrived, along with my small bar and pub chairs. I love them - they will fit in there nicely. I'm sure I need some other furniture - a comfy chair and bookcase, footstool, some art for the walls. I got some liquor bottles and some bar accessories - olives etc. 

The wood floor for the 3rd floor has presented me with a dilemma. I don't have enough of the 1/4 inch cherry stock, and the rest of the house has 3/8 stock. Earth n Tree is out of stock and I'm waiting on a reply from SH Goode. Those rooms are large up there, and require a fair amount of wood. I feel like I should maintain continuity and do the same cherry wood as the other rooms below. I did, however, get my template cut out for the center room - with appropriate cutouts. I used those polystyrene For Sale signs you get at the hardware store. Incidentally, I used this same thing for the base that I glued the ceiling bead board to. Worked like a charm, and was easy then to simply glue onto the ceiling. 

Moving on to other things, I stained some baseboard and the stair steps and railing for the 2nd floor stairs. The base stair risers and back will be white - for the stairs to mimic what I have on the first floor. Am now ready to install baseboard on some of the rooms. 

My dining room 'star' tiles arrived today and they are now glued on - so this weekend I will be grouting the floor - finally!

Monday, April 07, 2014

Dining Room Floor Redo

I haven't been happy with the old dining room floor - an attempt at a paperclay floor. A few years ago I redid the kitchen floor with real adobe tiles. It was quite a job - hacking away. Such an unpleasant job that I've put off doing it to the dining room. Until now.

I had planned on doing the same floor and had purchased enough tiles from the Italian tile artist. I pulled all that back out and decided that not only would I do this, but I'd add a 'star' of 4 tiles near each of the corners - jazz it up a little. I only have one of those stars, but as it just so happens, the Chicago Miniatures show is this weekend and she will be there. I'll grab the remaining 3 sets this weekend.

Here's my planning of the stars:


And tonight I attached the template and began gluing the tiles. 


Finished, and placed the star temporarily to get a sense. I have a few half tiles to place at the very back. Will get to those when I affix the stars this weekend. I'm very happy with it!