Showing posts with label stain. Show all posts

Friday, September 10, 2021

Chateau wood flooring stain

The wood floors have a first coat of General Finishes Cherry Oil Stain. Originally I expected I would need 2 coats, I seem to recall doing 2 coats in the French Country. I placed the flooring in the house and am thinking about leaving one coat, and just finishing with poly sealer. They are actually still drying and it gives me time to consider.

I rather like the lighter look. 


Sunday, September 01, 2019

French Country Bath Knee Wall

The knee wall I planned earlier this year got built and installed today. I attached the stained wainscoting, cut, stained and installed chair rail as well. I knew I didn't want the knee wall to go over the floor, so that came out, and got recut to fit the smaller space. I also attached the flooring to cardstock so it would lay flat and be removable so I have access to the tapewire on the floor under it.

I still have to paint the window frame and attach it. I'm experimenting with some colors, it will be more like the wainscoting though. Just placed furniture back in and its looking good. Nothing permanent yet, I had wanted to have a ring and shower curtain for the tub but that may take some work to add to the current shower stand.

Update on the window frame: FolkArt Home Decor Chalk paint - Java 34165, 1st coat on!


Sunday, August 25, 2019

Chateau Shingles

I had purchased cedar shingles for the Chateau and with the grey color on the exterior, I decided it would be best to have darker shingles. I had experimented with a few grey shingles, but I don't think it would have been enough of a contrast.

I finally stained these over the weekend (needed nice weather, no rain, not hot). I had read of other miniaturists adventures in staining and wasn't looking forward to it. I got some foil roasting pans and was going to do the sieve method - poking holes in the bottom of one so the stain would drip into the bottom pan. Turns out I got too large of a size, and the bottom of these pans was not flat, had ridges for juices. That really wasn't working for me.

I was on my concrete patio, using an older wrought iron table. I had brown craft paper on top of it and this was where I would lay out the wet shingles. As I was poking holes in the roasting pan, I knocked over the stain, and it did a fabulous job of making a mess. Quickly moping up and removing the wet craft paper, as I watched it drip down to the concrete patio...not a great start. Once I was ready to start again, I placed wax paper down first, then more craft paper and began. I gave up on the roasting pans and chose a smaller metal container. I finished the first of 3 bags and was nearly out of stain (1/2 pint). Off to the store for more, and then back at it. I got a rhythm going and finally finished all. Did a bunch of blotting with paper towels and really ran through blue latex gloves like they were going out of style!

I again laid out the 2 collections of shingles today to dry and they look really nice! 3000 shingles....count 'em! I used Minwax Red Mahogany.


Here's the original 3 bags - puts it in perspective about how many I have, and what the natural color was.


Wednesday, July 02, 2014

Staining and wood floors

I located some hinge locks at Rockler and while they are expensive, they are exactly what I wanted. Once installed, they made working on the 3rd floor a pleasure - no more posts holding the ceiling open.

My flooring strips arrived from Earth N Tree and yesterday I commenced cutting and fitting for all 3 of the 3rd floor rooms. Today I stained them, and once dry they will get polyurethane.

I also am working on bead board ceiling for the far right room - this will be a bedroom. Its cut and stained and when its dry, I will glue them to the template base and then attach to ceiling.


Monday, April 28, 2014

Doors stained and installed

Finally finished the door staining and have installed most of them. I ended up going over them with the stain pen, to get that same darker cherry as the windows.

 MBR - looks very rich with the wall color.


Bath - got to finish the chair rail now in same stain.


 Gentlemen's study

Conservatory off MBR
I also stained and put together the ceiling for the 3rd floor sitting area. The ceiling piece has now been installed, and will need to cut and attach the beams, as well as hang the light fixture.  Beams on each end and then a few across.


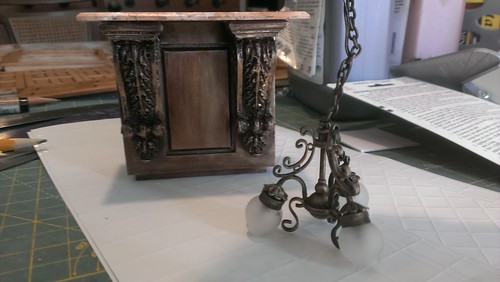
I antiqued this fixture - was black.

Saturday, April 26, 2014

Current work

Still working on staining interior doors and the beadboard I'm using for the 3rd floor center room. I pulled out my square wood stock, and have enough for 6 - 2 at ends and the rest in between. Or I could do less. I need to start staining them as well. Switched from Minwax gel cherry to General Finish Warm Cherry, after 2 coats of the other. I wasn't getting enough of the cherry color that the stain pen I'm using on the windows was providing. I think maybe one more coat of it and that will do it. Here's the color.


Since no wallpaper is tall enough, I will most likely "plaster" the walls and then paint them with a wash. Something plain like the living room - a slight yellow/dirty wash should work fine. So I should run some tapewire just above the baseboard in the 3rd floor first, then apply drywall mud.

I purchased Bespaq furniture for the center 3rd floor room - a pool table, a small bar counter, and some pub chairs.

And the Italian tile artisan didn't have enough of my 'stars' with her at the Bishop show so I'm waiting on her to mail them. Hope it doesn't take too long - I want to finish the floor and grout.

Sunday, April 20, 2014

Staining

I spent time today staining the interior doors cherry, the first coat. I'm pleased with the results, and know that staining takes time. I did the pre-conditioning and then the first coat of cherry stain. So far so good.

I also fiddled with the chandelier for the 3rd floor - its black. I experimented with a gold rub-n-buff and love the finished effect. Its kinda bronze antique. I think it is just the thing for this room. I've been obsessing (yep...obsessing) about the lighting for this room. I would like to put a billiard light in but the angled ceiling  prevents that...all the light fixtures along that line have solid poles, not accommodating for an angled installation.

Here's the chandelier's finish now. It was black before.


Saturday, January 26, 2013

Staining Furniture

I've been staining furniture and its been a learning experience. For some reason I've wanted to use gel stains and haven't been successful. So I switched back to regular stain and am getting the deeper richer color and finish.

I'm using Minwax Red Mahogany for the man's study bookcases, a pedestal, and the kitchen island. There's also a night stand that isn't stained enough to share.

Bookcases - Bespaq. They are coming along. I think this is the last coat but I will wait to see how they look when they are dry.


Here's the Kitchen Island. I have had this nice marble top for years and really wanted to use it. I added corbels from Lawbre, and stained it. Its looking really nice, even if it is hard to photograph.  Since adding the corbels and top, this piece is top heavy. I found some weights they use for pine derby cars and those are going to sit in the bottom shelf which will be sealed to hide them. 


This is a pedestal table, also Bespaq. It's also hard to photograph...it does look better than the photo.